Help · Connect your AI app

Connect HyperClapper to Claude

Check your plan, boost a post and see how it did, just by chatting with Claude. Setup takes about two minutes, and there is no API key: you sign in with your HyperClapper account.

About 2 minutes · 13 short steps · You approve every boost
Before you start

Three things you need

A HyperClapper account

Any plan works. Log in at app.hyperclapper.com. To let Claude start boosts, save at least one preset first.

Claude in your browser

Use Claude on the web at claude.ai. Setting up from the phone app is not covered here.

The server URL

Paste this into Claude: https://mcp.hyperclapper.com. You can also copy it from Settings, MCP tab, in HyperClapper.

Good to know: you never paste a password or API key into Claude. You sign in on a HyperClapper page and choose Allow.

Watch it first

The whole setup in one short loop

Every screen you will see, in order. Each one is explained below.
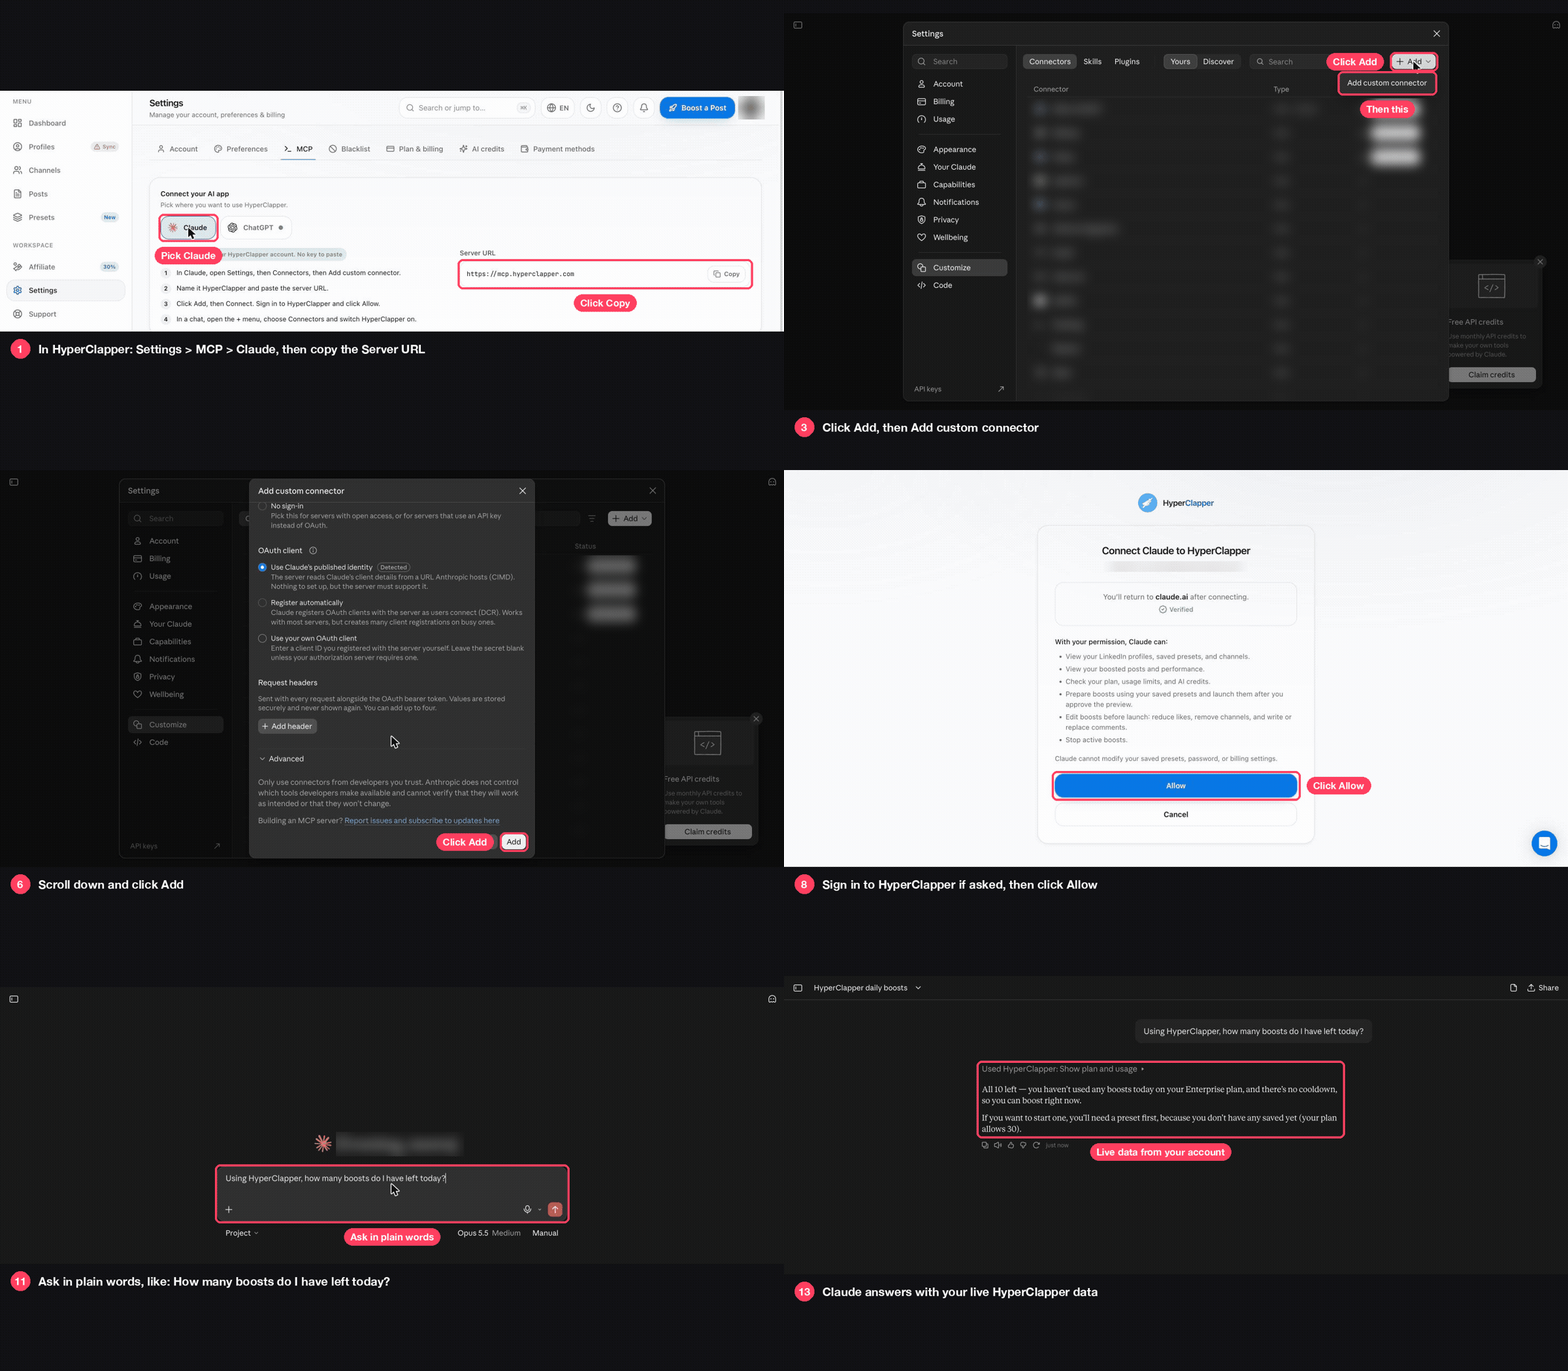
Animated walkthrough of connecting HyperClapper to Claude, step by step
Step by step

Connect in 13 steps

The red boxes in each picture show where to click. Do the steps in order and keep the HyperClapper tab open.

Step 1

Copy the server URL from HyperClapper

Log in to HyperClapper, click Settings and open the MCP tab. Pick Claude and click Copy next to the Server URL. You will paste it in step 4.
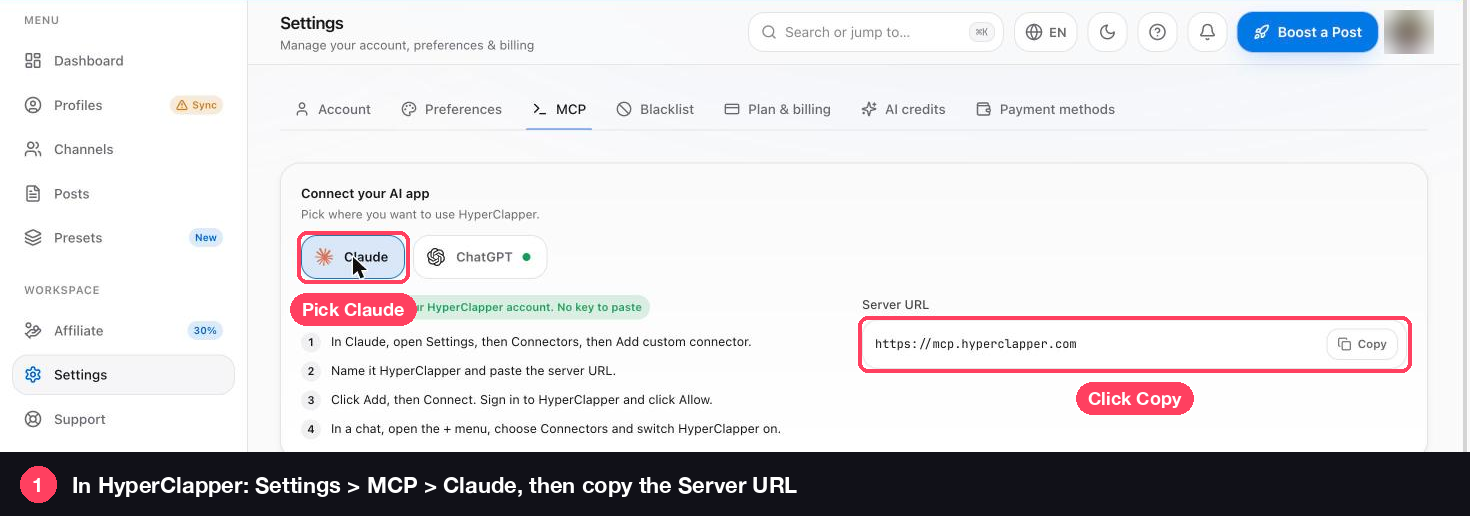
✓The URL is the same for everyone: https://mcp.hyperclapper.com
✓There is no API key to copy. You sign in later instead
HyperClapper Settings, MCP tab, with Claude selected and the Copy button next to the server URL highlighted
Step 2

Open Settings, then Customize, in Claude

In claude.ai, open Settings and click Customize in the left menu. Make sure the Connectors tab is selected at the top.
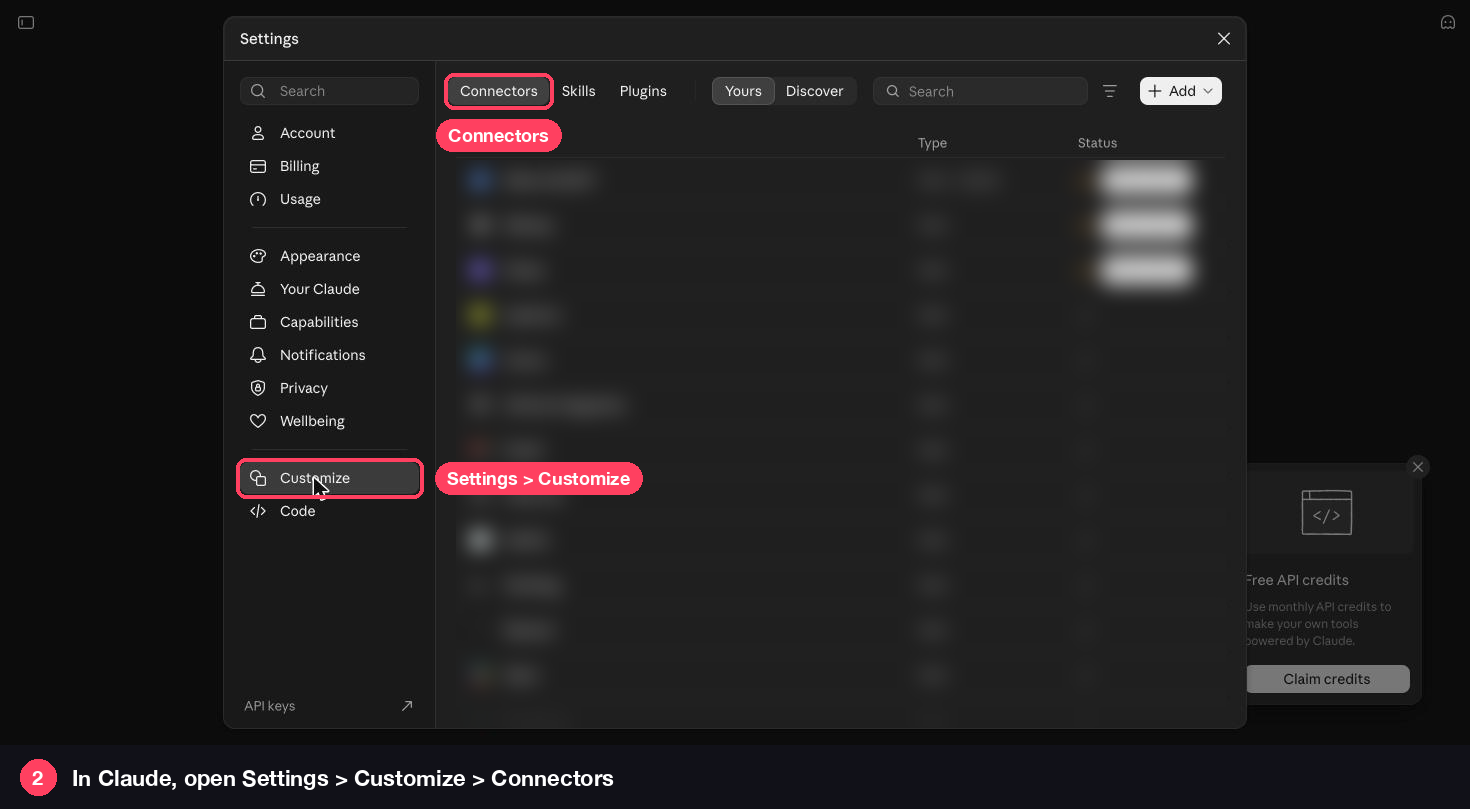
✓Connectors used to have their own page in Settings. Claude moved them to Customize
✓Your other connectors are listed here too
Claude Settings with Customize selected and the Connectors tab highlighted
Step 3

Click Add, then Add custom connector

Click the Add button in the top-right corner. Choose Add custom connector from the menu.
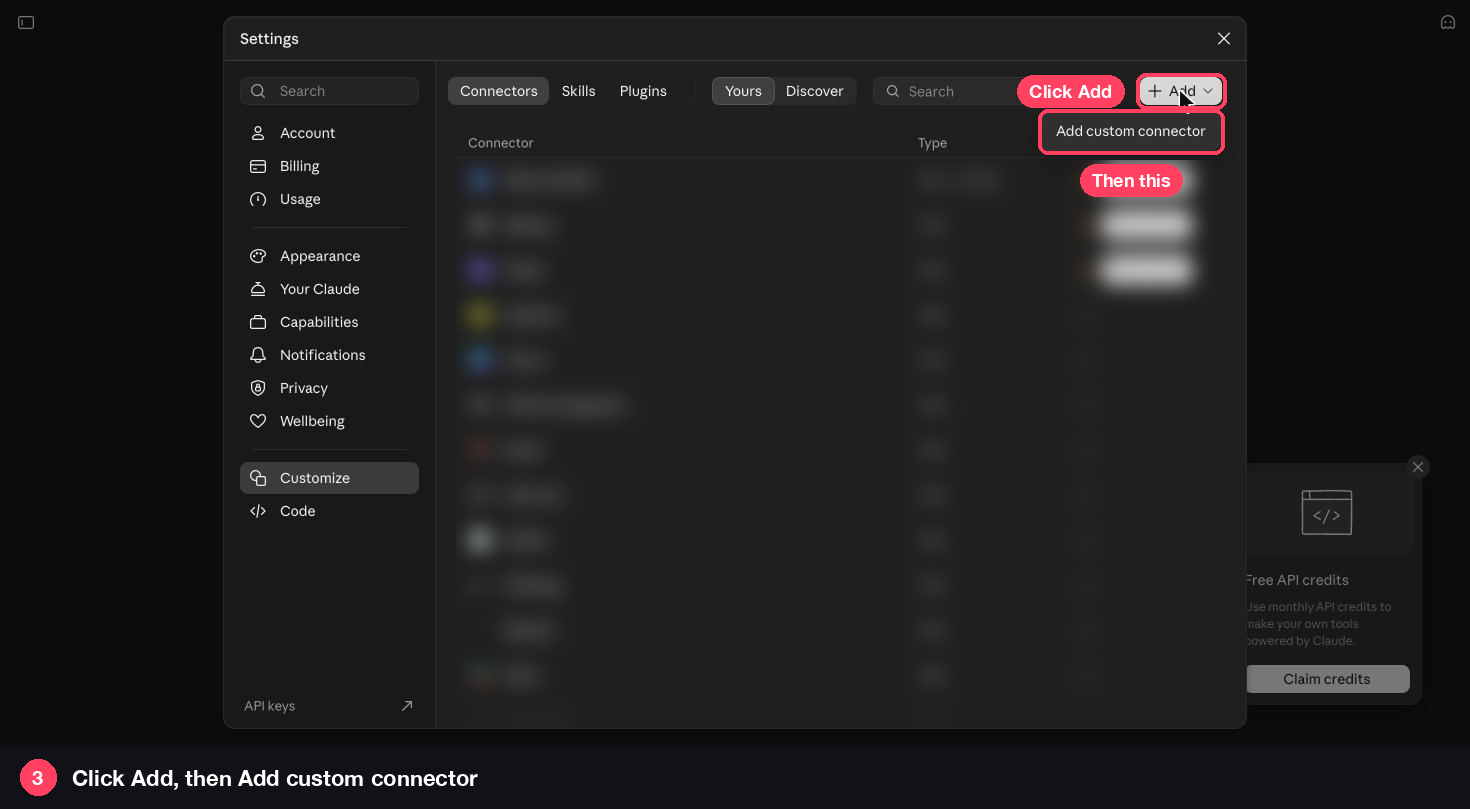
✓Do not pick a connector from Discover. HyperClapper is added as a custom connector
The Add menu open with Add custom connector highlighted
Step 4

Enter the name and URL

A box called Add custom connector opens. Type the name, paste the server URL and click Continue.

✓Name: HyperClapper
✓MCP server URL: paste the URL from step 1
The Add custom connector box with HyperClapper as the name, the server URL pasted and the Continue button highlighted
Step 5

Leave the sign-in settings as they are

Claude checks the HyperClapper server and picks the right sign-in options for you. Both show Detected.
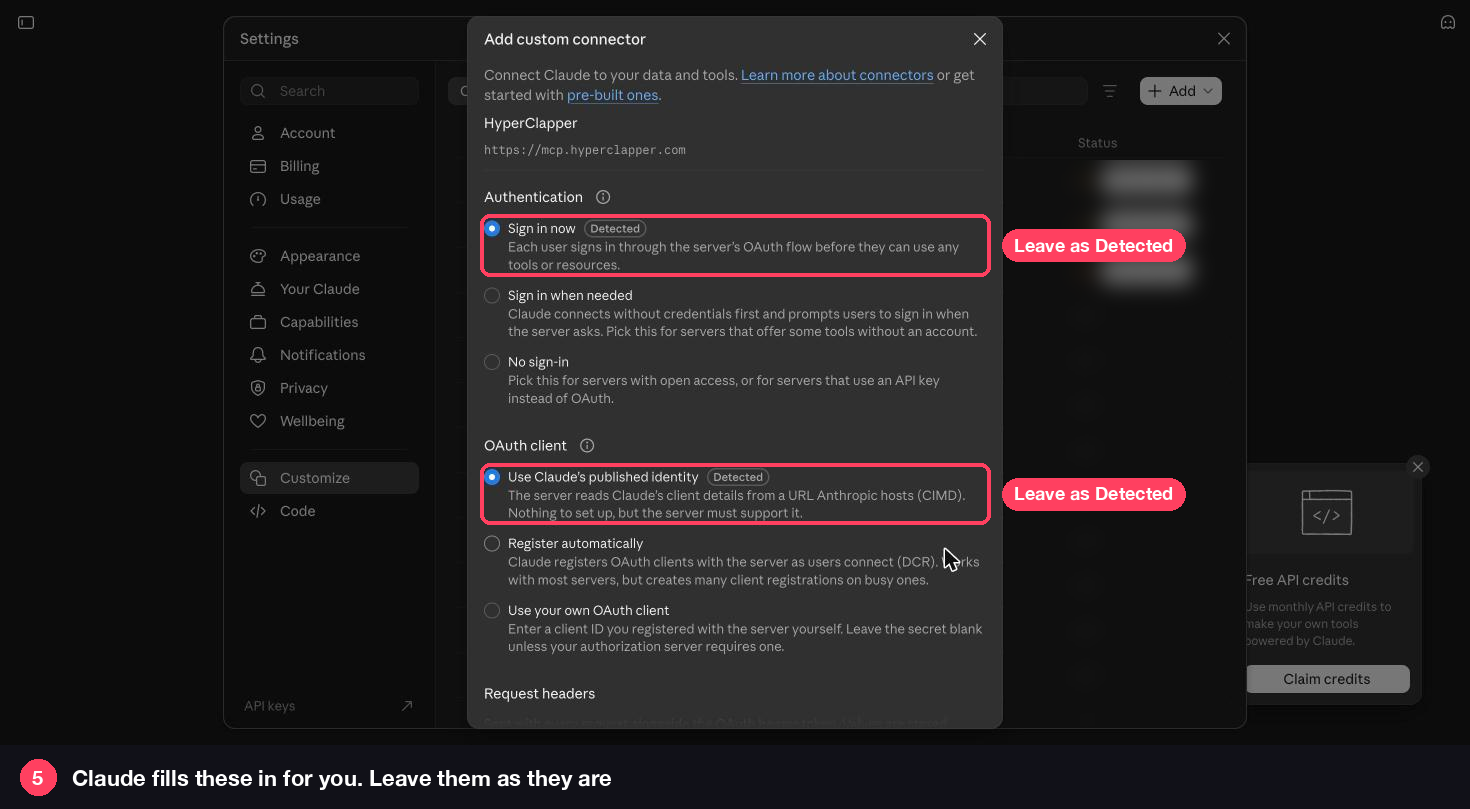
✓Authentication: Sign in now
✓OAuth client: Use Claude’s published identity
✓You do not need to change anything here
The Authentication and OAuth client options, both marked Detected
Step 6

Scroll down and click Add

Scroll to the bottom of the box and click Add.
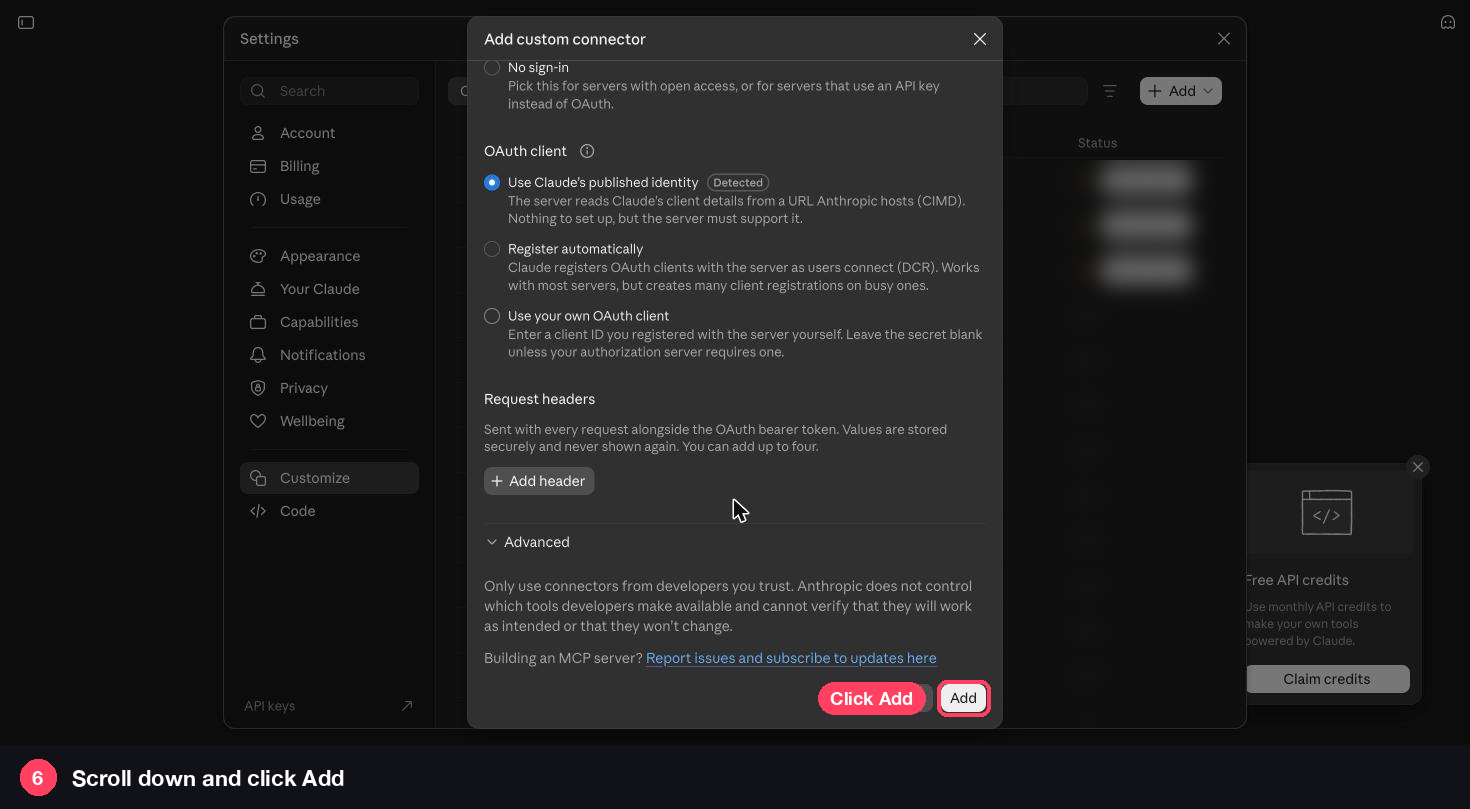
✓You do not need to add any request headers
The bottom of the Add custom connector box with the Add button highlighted
Step 7

Click Connect

Claude adds HyperClapper and says you are not connected yet. Click Connect and a HyperClapper page opens.
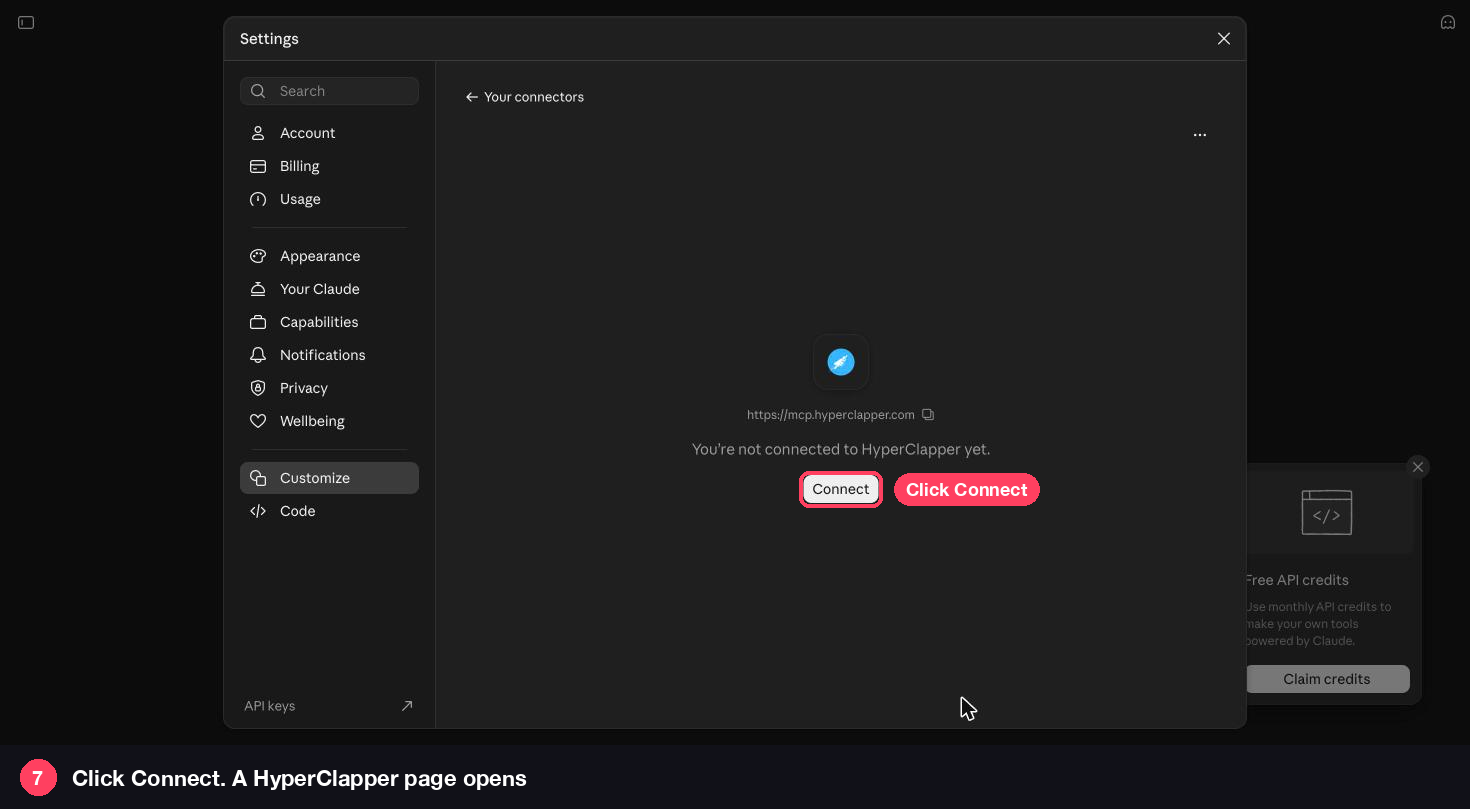
✓If nothing opens, check that your browser is not blocking pop-ups for claude.ai
The HyperClapper connector page saying You are not connected to HyperClapper yet, with the Connect button highlighted
Step 8

Sign in and click Allow

Sign in to HyperClapper if you are asked. The page lists exactly what Claude will be able to do. Read it, then click Allow.
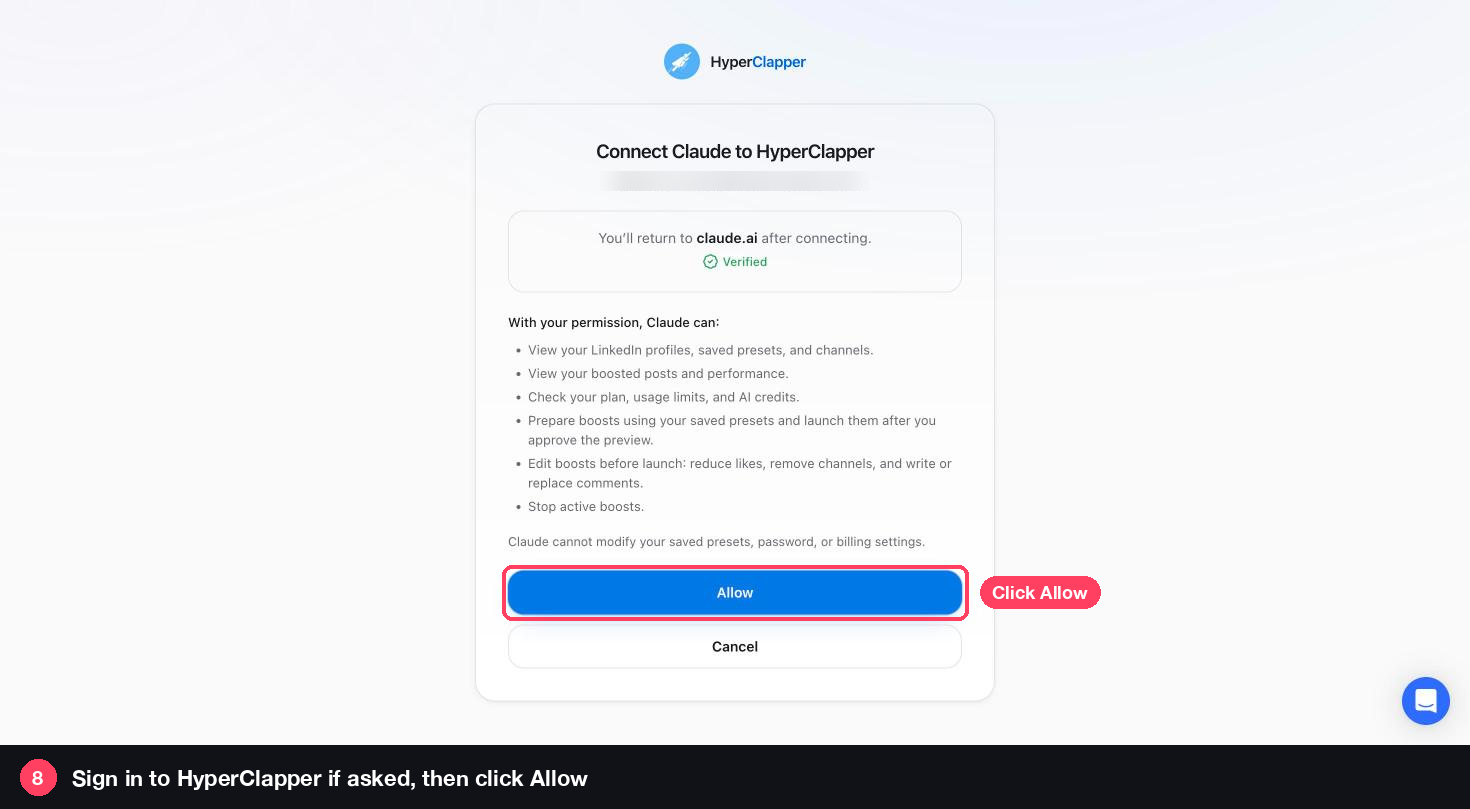
✓Claude can see your profiles, presets, channels, boosts and plan
✓It can prepare boosts, but they only start after you approve the preview
✓It can never change your saved presets, password or billing
The HyperClapper page Connect Claude to HyperClapper listing permissions, with the Allow button highlighted
Step 9

Check that it is connected

You are sent back to Claude. The HyperClapper connector page now shows a Disconnect button and its tools.
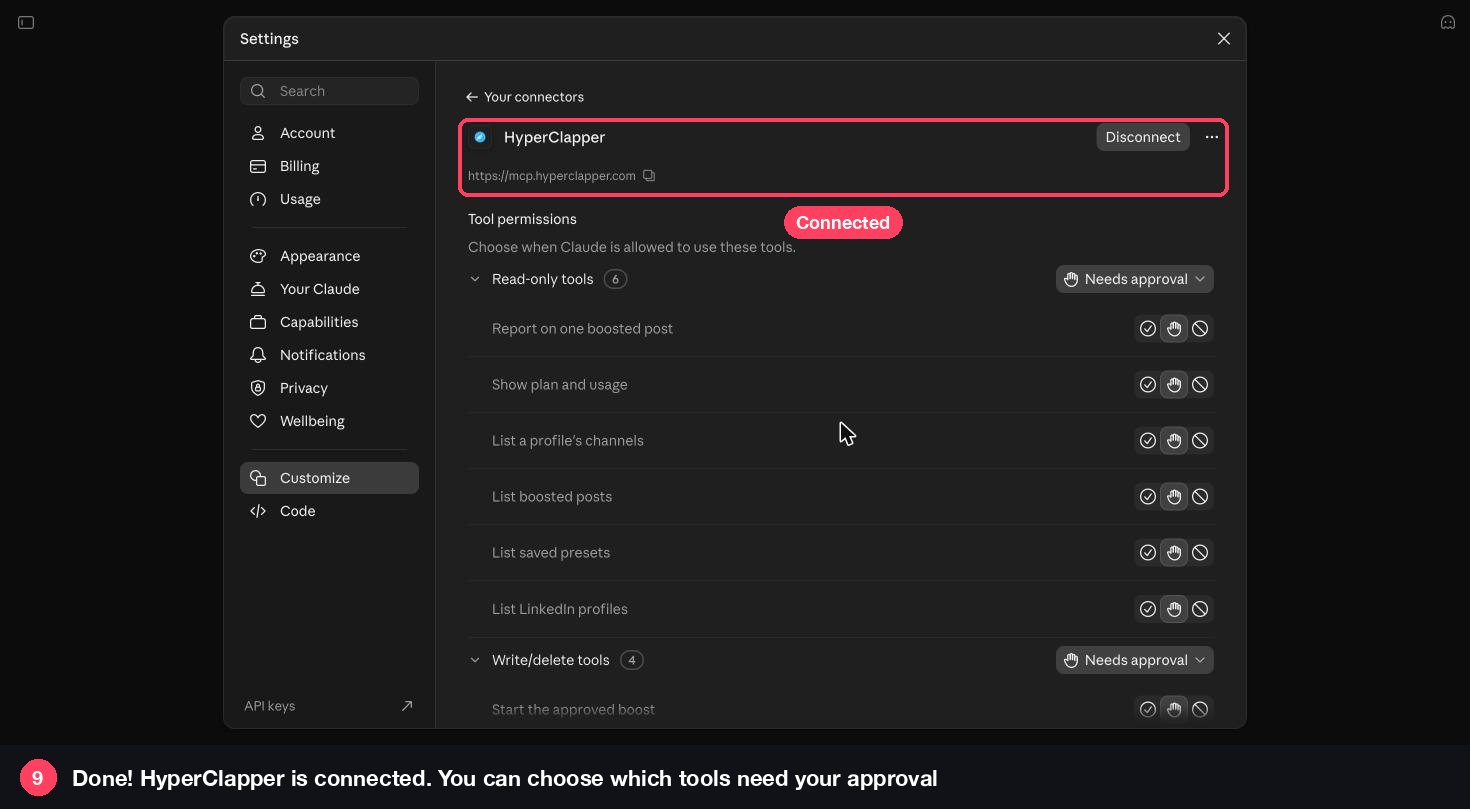
✓Under Tool permissions you can choose which actions need your approval
✓You only do this setup once
The HyperClapper connector page in Claude showing it is connected, with its tool permissions
Step 10

Switch HyperClapper on in a chat

In a new chat, click the + button, open Connectors and make sure HyperClapper is switched on.
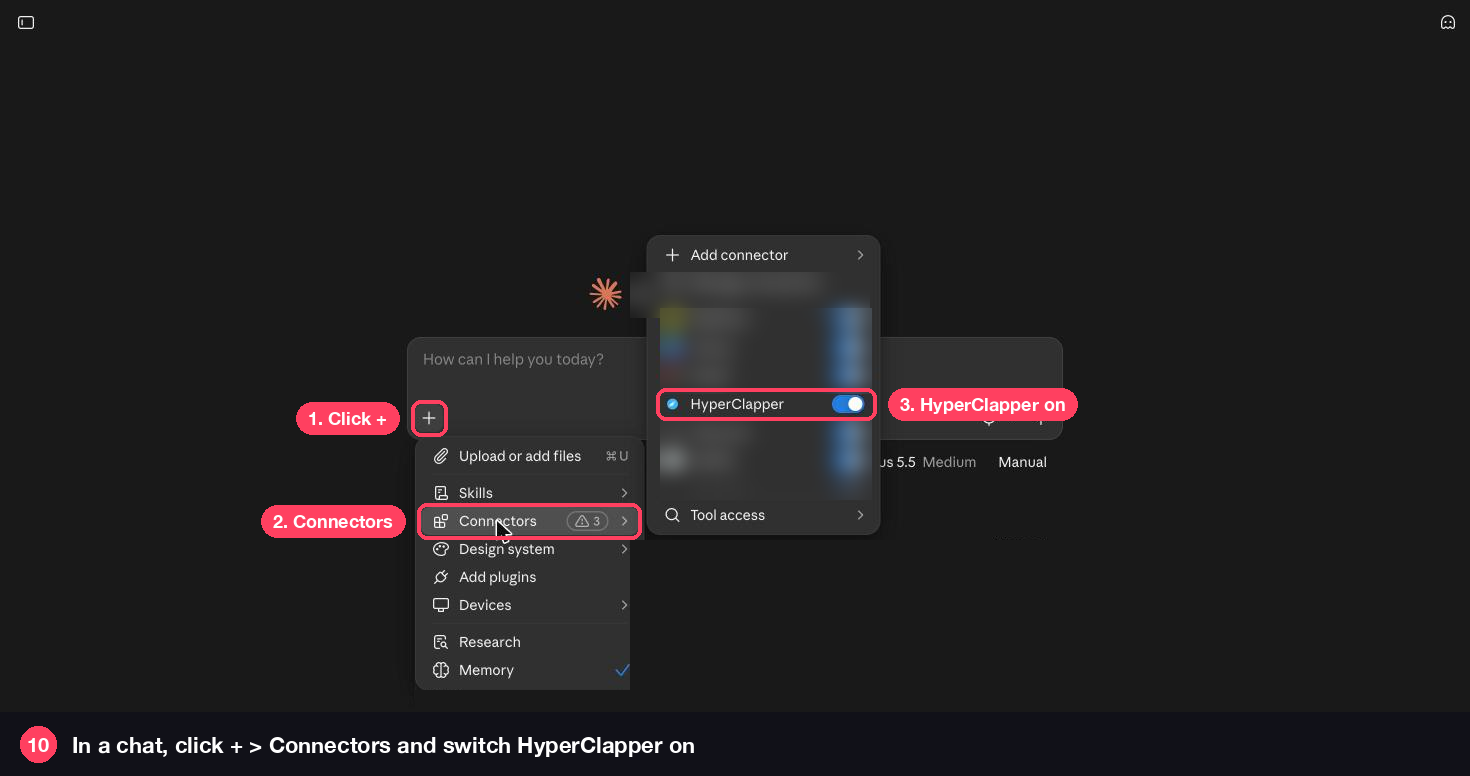
✓A blue switch means it is on
✓It stays on for your next chats
The + menu in a Claude chat with Connectors open and the HyperClapper switch turned on
Step 11

Ask Claude in plain words

Type your question, for example “Using HyperClapper, how many boosts do I have left today?”
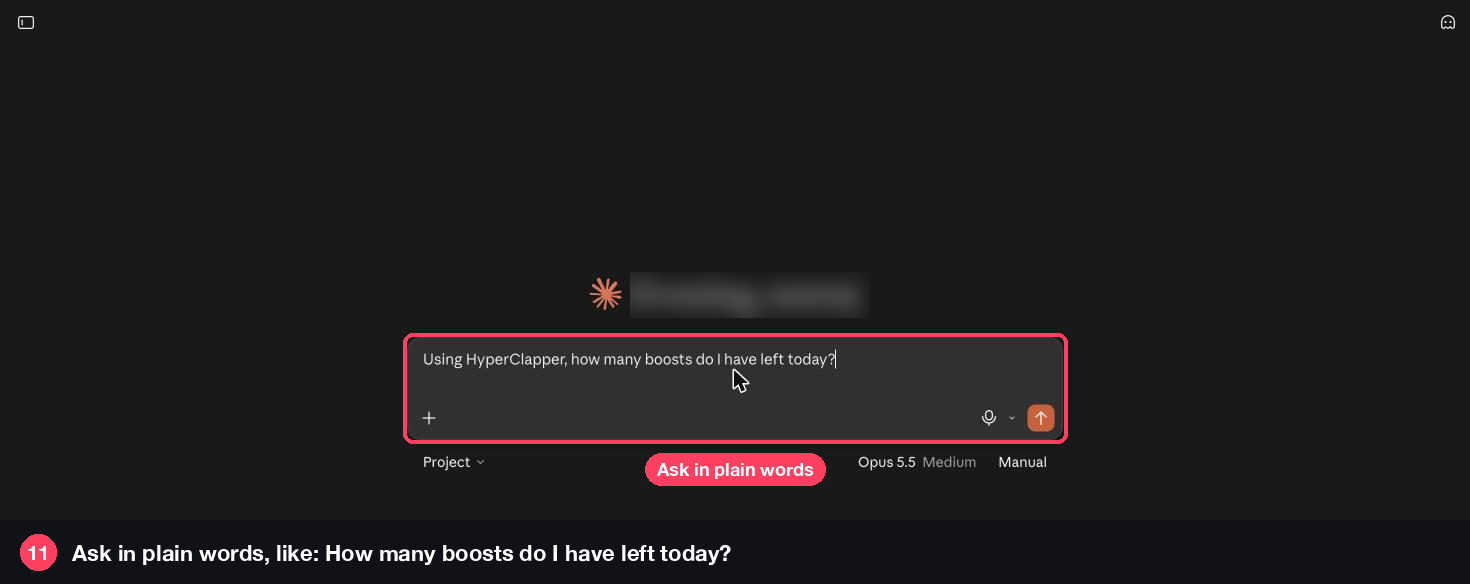
✓Mentioning HyperClapper in your message helps Claude pick it
✓See the list below for more things to ask
A new Claude chat with Using HyperClapper, how many boosts do I have left today typed in
Step 12

Approve the first request

The first time, Claude asks before it uses HyperClapper. Click Allow once, or Always allow so it does not ask again for this kind of request.
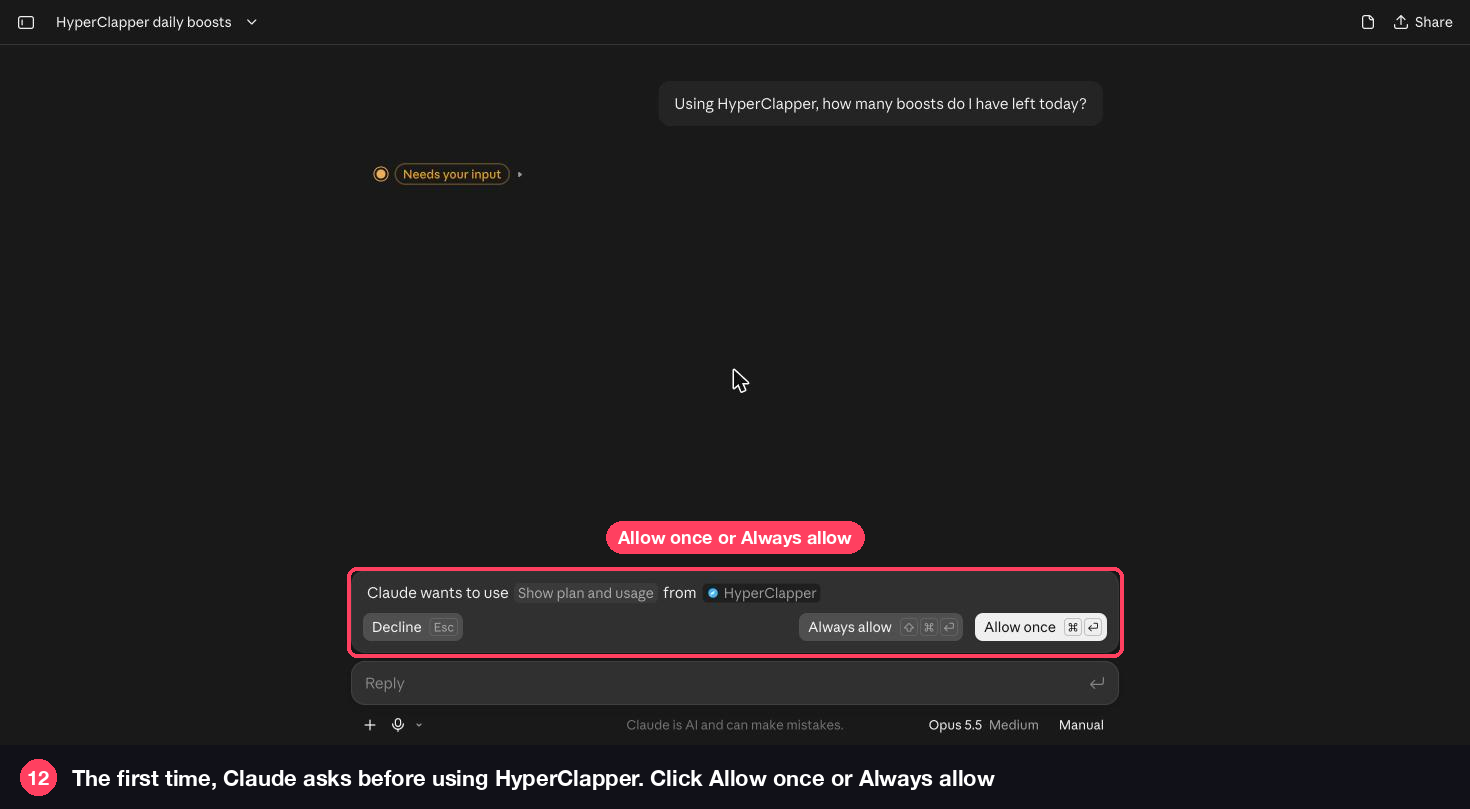
✓Read-only questions, like your plan or boosts, are safe to always allow
✓You can change this later on the connector page
Claude asking to use Show plan and usage from HyperClapper, with Allow once and Always allow buttons
Step 13

Get answers from your account

Claude reads your HyperClapper account and answers. That is it, you are set up.
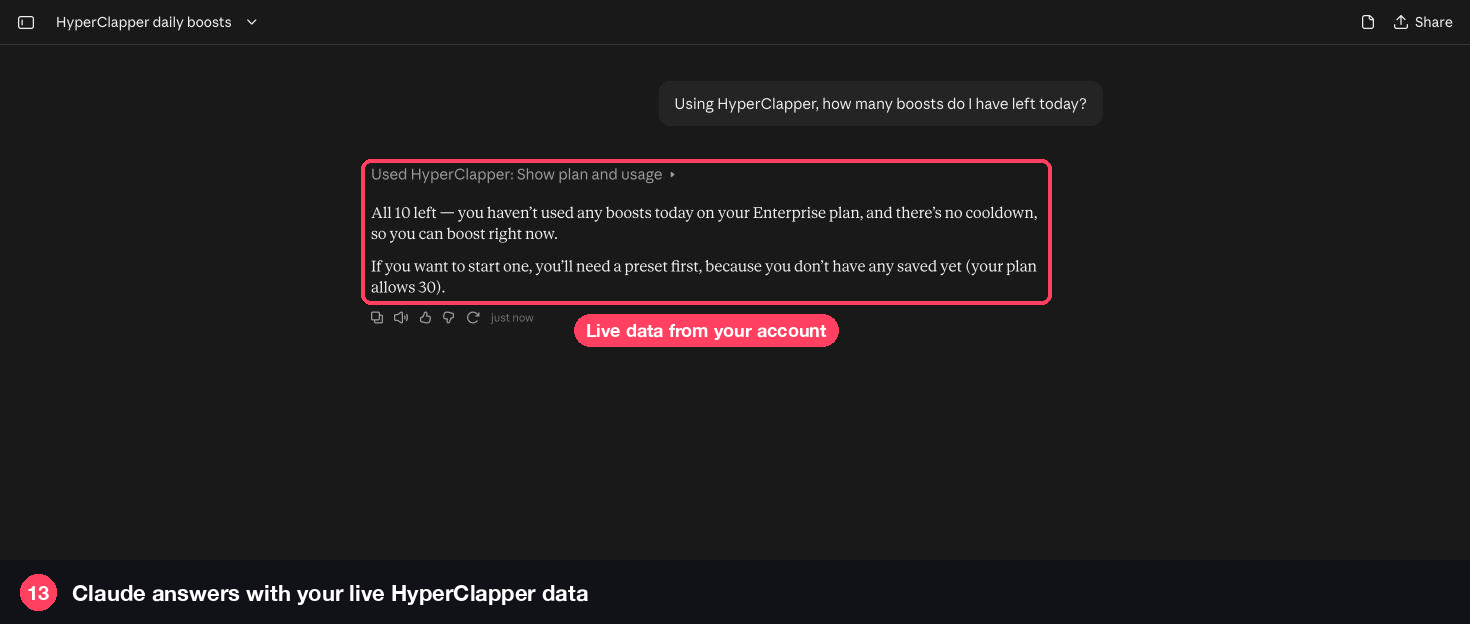
✓Answers use your live data, not a guess
✓Before any boost starts, Claude shows you a preview to approve
Claude answering: all 10 boosts left today on your Enterprise plan
Once you are connected

What to ask Claude

Just ask in plain words. Here are some to start with.

Try these

Copy one into a new chat

✓“Show my LinkedIn profiles and my presets.”
✓“How many boosts do I have left today?”
✓“Boost [post link] with my default preset. Show me the preview first.”
✓“Use 20 likes and skip the last 2 comments.”
✓“How did my last boost do?”
✓“Stop the boost on my latest post.”
You stay in control

What Claude can and cannot do

✓It shows a preview first. Every boost starts from one of your saved presets, and nothing starts until you approve its preview in the chat.
✓It cannot change your settings. Your saved presets, password and billing are off limits.
✓You can switch it off. Disconnect any time from Settings, MCP tab, in HyperClapper.
Something not working?

Quick fixes and answers

I cannot find Connectors in Claude’s settings+

Claude moved them. Open Settings, click Customize, then pick the Connectors tab.

Claude answers without using HyperClapper+

In the chat, click +, open Connectors and check that HyperClapper is switched on. Mentioning HyperClapper in your message helps too.

Claude keeps asking for permission+

Click Always allow on the request, or set the tool permissions on the HyperClapper connector page in Settings, Customize.

Can Claude start a boost without asking me?+

No. Every boost starts from one of your saved presets, and nothing starts until you approve its preview in the chat.

Do I need an API key?+

No. You sign in with your HyperClapper account when you click Connect, so there is nothing to copy or keep safe.

How do I disconnect?+

In HyperClapper, open Settings, then the MCP tab, and click Disconnect. You can also click Disconnect on the HyperClapper connector page in Claude.

Ready to boost from Claude?

Open the MCP tab in HyperClapper, copy your server URL and you are two minutes away. Stuck? Email us and a person on our team will help.

support@hyperclapper.com